
 Pin it
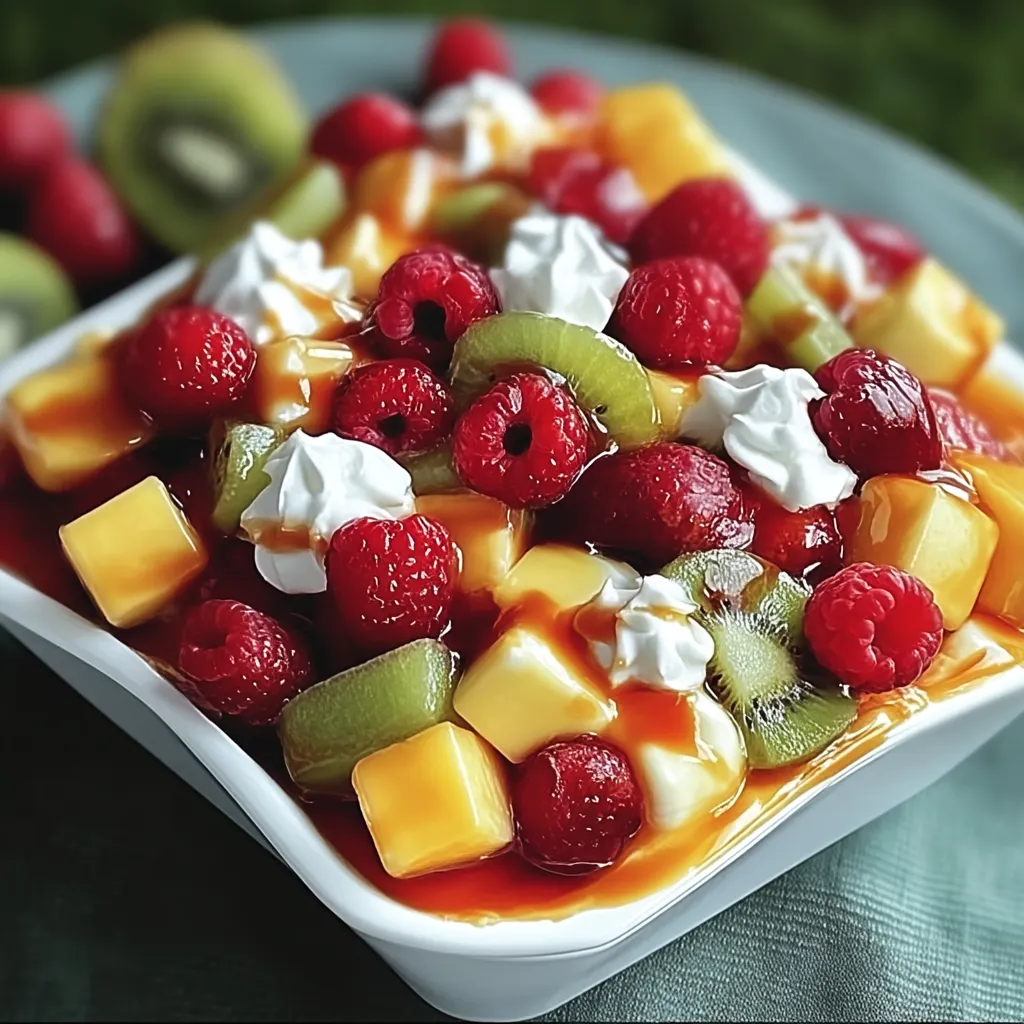
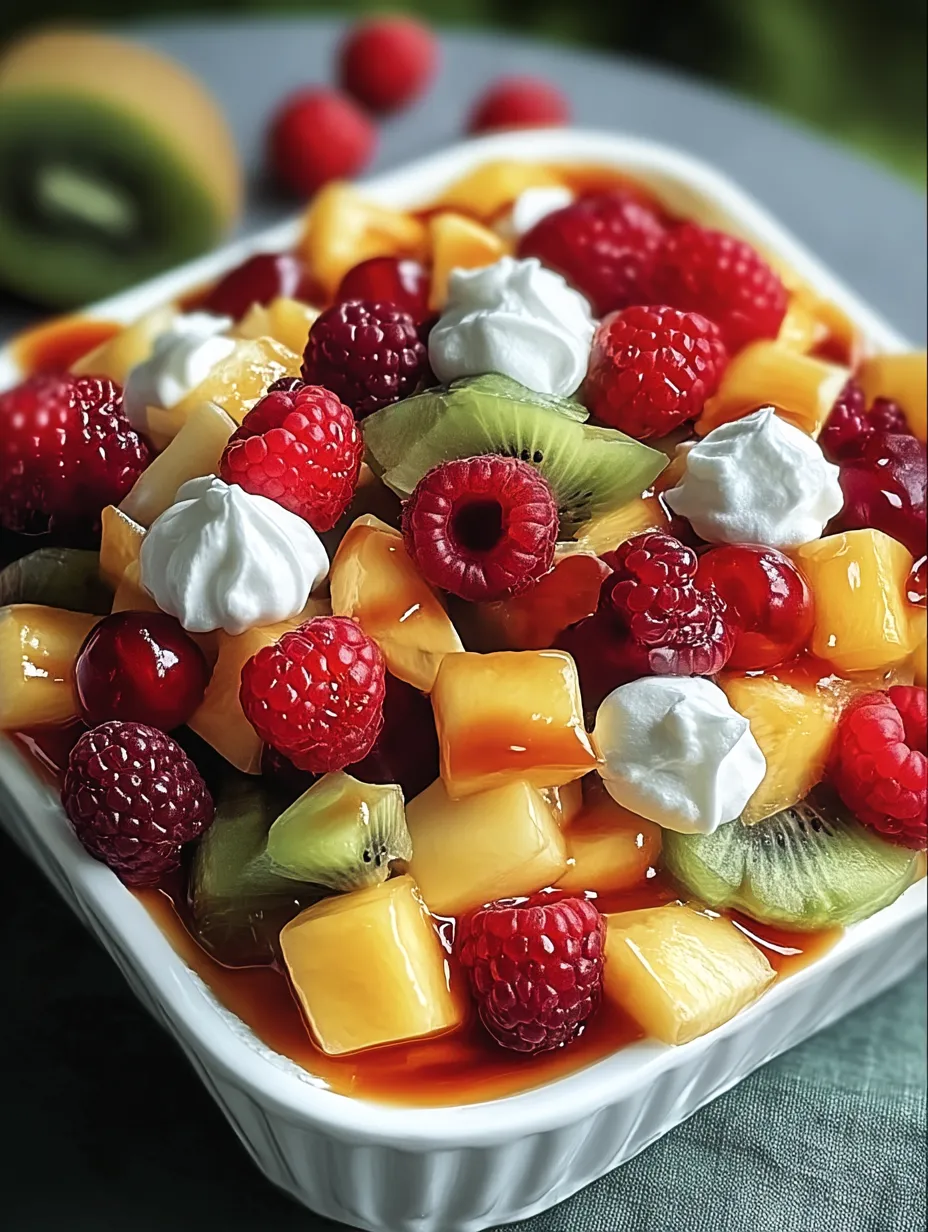
This cheesecake fruit salad transforms simple ingredients into an extraordinary no-bake dessert that perfectly balances creamy indulgence with fresh, vibrant fruit flavors. Unlike traditional fruit salads dressed with just honey or yogurt, this version features a luscious cream cheese mixture that coats each piece of fruit with what essentially tastes like no-bake cheesecake filling. The beauty of this dessert lies in its versatility – the creamy base provides a consistent canvas while the fruits can be adjusted based on season, preference, or what's available at your local market. Perfect for warm weather gatherings, potlucks, or anytime you need a crowd-pleasing dessert without turning on the oven, this cheesecake fruit salad delivers impressive flavor and presentation with minimal effort.
I first created this recipe when hosting a summer gathering where I needed a dessert that could be made ahead and would appeal to guests of all ages. The response was extraordinary – both adults and children went back for seconds, and I received four recipe requests before the party ended. What surprised me most was how something so simple could taste so indulgent. My grandmother, who's notoriously picky about desserts, declared it "better than regular cheesecake" because of the fresh fruit component. Now it's become my signature contribution to warm-weather potlucks, and I keep the ingredients on hand for last-minute entertaining or whenever my family needs a special treat.
Simple Ingredients
- 8 oz cream cheese, softened: Creates the rich, tangy base reminiscent of cheesecake
- 8 oz whipped topping: Adds lightness and fluffy texture to the cream mixture
- ½ cup powdered sugar: Provides sweetness without the grittiness of granulated sugar
- 1 teaspoon vanilla extract: Enhances flavor with warm, aromatic notes
- 6 cups assorted fresh fruits: Delivers color, natural sweetness, and nutritional value
The quality of your ingredients significantly impacts this simple dessert. For the cream cheese, ensure it's properly softened at room temperature for at least an hour to achieve the smoothest texture without lumps. While any brand of whipped topping works, higher quality varieties with fewer additives often yield better results. When selecting fruits, focus on ripeness and freshness – fruits at their peak will provide the best natural sweetness and texture. I typically include a variety of colors, textures, and flavors: strawberries and raspberries for vibrant red tones and slight tartness; blueberries and blackberries for deep color contrast; grapes for juicy sweetness; kiwi for tropical tang and beautiful green color; and pineapple chunks for bright yellow and tropical flavor.
Easy Preparation
- Cream Cheese Base Preparation:
- Begin with properly softened cream cheese – it should yield easily to gentle pressure but still maintain some structure, not be completely soft or melted. Place the 8 ounces of softened cream cheese in a large mixing bowl. Using an electric mixer on medium speed, beat the cream cheese until completely smooth and free of any lumps, approximately 2-3 minutes. Scrape down the sides of the bowl halfway through to ensure even mixing. This thorough beating of the cream cheese is crucial for a smooth base without lumps, which would detract from the final texture. Once the cream cheese is perfectly smooth, gradually add the half cup of powdered sugar in small batches, mixing well after each addition until fully incorporated. Add the teaspoon of vanilla extract and mix until just combined. The resulting mixture should be smooth, slightly sweet, and have a light vanilla aroma that complements both the cream cheese and the fruits to come.
- Incorporating the Whipped Topping:
- The technique used for incorporating the whipped topping is critical to maintaining the light, airy texture of the finished dessert. Switch from your electric mixer to a rubber spatula for this step to prevent overworking the mixture, which could deflate the whipped topping. Add the 8 ounces of whipped topping to the cream cheese mixture. Using the rubber spatula, gently fold the whipped topping into the cream cheese base with a down-center-up-and-over motion, rotating the bowl as you work. Continue this folding motion until the mixture is uniform in color and consistency with no streaks remaining, but be careful not to overmix. The goal is a light, fluffy, mousse-like consistency that will beautifully coat the fruit without being heavy. This step typically takes about 1-2 minutes of gentle folding. Once completely combined, the mixture should be able to hold soft peaks and have a silky, spoonable texture that will cling lightly to the fruit without being runny or too stiff.
- Fruit Preparation:
- Proper fruit preparation ensures the perfect texture and presentation in your finished cheesecake fruit salad. Begin by thoroughly washing all fruits under cool running water, then pat completely dry with paper towels or a clean kitchen towel. Excess moisture can dilute the creamy dressing, so this drying step is essential. Once dry, prepare each fruit appropriately: hull and quarter strawberries (or slice if very large); leave blueberries and grapes whole unless exceptionally large; peel and dice kiwis into bite-sized pieces; core and dice pineapple into half-inch chunks; slice bananas, if using, into half-inch rounds just before mixing to prevent browning. Aim for relatively uniform, bite-sized pieces that are easy to eat and ensure each spoonful contains a good mix of fruits and creamy dressing. For fruits that tend to brown quickly like apples, bananas, or pears, toss them with a tablespoon of lemon juice before adding to the mixture. This adds a bright note while preventing discoloration. Place all prepared fruits in a large bowl, gently tossing to distribute the varieties evenly.
- Final Assembly:
- The final assembly requires a gentle touch to maintain the integrity of both the creamy mixture and the prepared fruits. If using mini marshmallows, add the cup of them to the bowl of prepared fruits and toss gently to distribute. The marshmallows add a playful texture contrast and subtle sweetness that complements both the fruits and the creamy dressing. Pour approximately half of the cream cheese mixture over the fruit and marshmallow combination. Using a large rubber spatula or wooden spoon, fold the mixture together with a gentle lifting motion from the bottom of the bowl, turning the fruits over rather than stirring, which can break delicate berries. Once the first half is incorporated, add the remaining cream cheese mixture and continue the gentle folding until all fruits are evenly coated with a light layer of the creamy dressing. The goal is to have each piece of fruit enrobed in the cream cheese mixture without crushing or macerating the fruits. The finished consistency should be creamy but still allow each fruit to maintain its individual integrity and vibrant color.
- Chilling and Serving:
- Cover the bowl with plastic wrap and refrigerate for at least one hour, though two to four hours is ideal for the flavors to fully meld and the texture to set properly. This chilling period not only allows the cream cheese mixture to firm up slightly but also gives time for the natural fruit flavors to infuse into the creamy base, creating a more cohesive dessert experience. When ready to serve, give the salad a gentle stir to redistribute any dressing that may have settled at the bottom of the bowl. Transfer to a decorative serving bowl if desired, especially if presenting for a gathering. For an extra special presentation, reserve a few pieces of the most colorful fruits and arrange them on top of the salad just before serving. A light garnish of fresh mint leaves adds a beautiful color contrast and subtle aromatic note. Serve chilled, using a large spoon to portion. This cheesecake fruit salad maintains its best texture and flavor when kept cool, so for outdoor events, consider nestling the serving bowl in a larger bowl filled with ice to maintain the proper temperature.
I've made countless variations of this cheesecake fruit salad over the years, and it never fails to impress. What continues to surprise me is how something so simple can taste so complex and satisfying. During berry season, I've made it with nothing but various berries for an intensely fruity version, while winter versions with citrus segments and pomegranate arils have been equally delicious. The first time I made it for my husband's family gathering, his mother quietly asked me for the recipe – the highest compliment from someone who rarely cooks from others' recipes. I've found it's one of those perfect desserts that bridges the gap between everyday and special occasion, as appropriate for a Tuesday night family dinner as it is for a holiday celebration.
 Pin it
Seasonal Fruit Variations
Customize this versatile dessert throughout the year by focusing on peak-season fruits that offer the best flavor, value, and nutritional content. For spring preparations, highlight fresh strawberries, raspberries, and mandarin oranges, which offer bright colors and vibrant flavors that signal the season's renewal. Summer versions shine with juicy stone fruits like peaches, nectarines, and cherries alongside berries at their peak sweetness, creating a celebration of the season's bounty. As autumn approaches, transition to crisp apples, firm pears, and fresh grapes, perhaps with a subtle adjustment to the cream cheese mixture by adding a quarter teaspoon of cinnamon that complements these fall fruits beautifully. Winter adaptations might feature citrus segments from blood oranges, grapefruits, and clementines, paired with kiwi and pomegranate arils for a jewel-toned presentation that brightens dark months. For tropical-themed gatherings any time of year, focus on mango, pineapple, papaya, and banana, perhaps with a teaspoon of coconut extract added to the cream cheese mixture and toasted coconut sprinkled on top. By adjusting your fruit selections seasonally, you'll not only ensure the best flavor but also create a dessert that feels perpetually fresh and appropriate regardless of when you're serving it.
Creative Serving Ideas
Transform this adaptable dessert for various occasions with thoughtful presentation approaches that elevate the basic recipe. For elegant dinner parties, serve individual portions in clear glass dessert cups or wine glasses, layering the cream cheese mixture with fruits for a parfait-like presentation topped with a mint leaf and a single perfect berry. Create a dessert grazing table by serving the cheesecake fruit salad as the centerpiece surrounded by complementary items like miniature shortbread cookies, chocolate dipped strawberries, and small bowls of honey or chocolate sauce for drizzling. For brunch gatherings, offer the fruit salad alongside a selection of pastries and a pot of coffee, providing a lighter option that still feels indulgent enough for a special morning meal. Children's parties can feature a "build your own" station with the cream cheese base in one bowl and various fruits in others, allowing young guests to customize their dessert with preferred fruits and additional toppings like sprinkles or mini chocolate chips. For holiday celebrations, arrange the finished salad in a hollowed watermelon half or pineapple boat for a conversation-starting presentation that doubles as an edible serving vessel, particularly effective for summer gatherings where the fresh presentation complements the light dessert.
Troubleshooting Tips
Achieve perfect results every time by understanding common challenges and their solutions when preparing cheesecake fruit salad. If your cream cheese mixture develops lumps, the cream cheese likely wasn't softened enough initially; next time, ensure it reaches room temperature completely, or if you're in a hurry, microwave it in 10-second intervals until just softened but not melted. For a mixture that seems too runny, refrigerate the cream cheese base for 30 minutes before folding in the fruits, or add an additional 2 tablespoons of powdered sugar, which helps stabilize the mixture. When facing fruits that release excessive juice and dilute the creamy dressing, toss particularly juicy varieties like strawberries or pineapple with a tablespoon of powdered sugar and let them sit in a colander for 10 minutes to draw out excess moisture before patting dry and adding to the mixture. If bananas or apples are browning too quickly in the salad, toss them in 1-2 tablespoons of lemon or pineapple juice before adding to the mixture, which prevents oxidation while adding a complementary flavor note. Should the dessert seem too sweet, balance it with a tablespoon of fresh lemon juice added to the cream cheese mixture, or include more tart fruits like green apples or raspberries in your selection.
Make-Ahead and Storage
Maximize convenience without compromising quality through strategic make-ahead and storage approaches for this popular dessert. For optimal results when preparing in advance, make the cream cheese mixture up to 24 hours ahead and store it covered in the refrigerator separate from the prepared fruits, then combine just 1-2 hours before serving to prevent the fruits from releasing excessive juice into the mixture. When storing leftovers, transfer to an airtight container and consume within 2-3 days, understanding that the texture will change somewhat as fruits continue to release juices – while still delicious, it becomes more like a creamy fruit soup after the first day. For potlucks or traveling situations, transport the salad in a cooler with ice packs, and consider bringing the cream cheese mixture and prepared fruits in separate containers to combine at your destination if the travel time exceeds 30 minutes. If using fruits prone to browning like bananas, apples, or pears, place them on top of the salad rather than mixing them in, and gently press plastic wrap directly onto their surface before covering the container to minimize air exposure. For portion control and convenient serving, prepare individual portions in small mason jars or dessert cups with lids, which allows for easy grab-and-go options from the refrigerator that maintain their presentation quality.
 Pin it
This cheesecake fruit salad has become one of my signature contributions to gatherings – the recipe friends and family request most frequently when I ask what I can bring. What began as a simple solution for a summer party has evolved into countless variations for different seasons and occasions. I particularly love watching people's expressions when they taste it for the first time, that moment of surprise when they realize it's essentially deconstructed cheesecake in a more refreshing, fruit-forward form. There's something deeply satisfying about creating a dessert that feels simultaneously indulgent and light, that can be adapted to any season, and that brings together simple ingredients in a way that becomes more than the sum of its parts.
Frequently Asked Questions
- → Can I use light or fat-free products in this recipe?
- Yes! You can use light cream cheese, fat-free yogurt, and lite whipped topping to reduce the calories and fat content. The texture may be slightly less rich, but the flavor will still be delicious. The pudding mix helps maintain the thick, creamy consistency even with lighter ingredients.
- → What fruits work best in this salad?
- Fruits that hold their shape well and aren't overly juicy are ideal. Berries, grapes, kiwi, and well-drained canned fruits work beautifully. If you want to use softer fruits like bananas or peaches, add them just before serving. Avoid very juicy fruits like watermelon as they can make the salad watery.
- → Can I make this without pudding mix?
- Yes, though the pudding mix helps with both flavor and texture. If you want to skip it, increase the powdered sugar to 1/2 cup and add an extra 4 oz of cream cheese. You could also add 1-2 tablespoons of lemon juice and a bit more vanilla to enhance the cheesecake flavor.
- → How far in advance can I make this salad?
- For the best results, prepare the cheesecake mixture up to 24 hours in advance and store it separately from your prepared fruit. Combine them about an hour before serving. If you must make the entire salad ahead, it will keep for about 2 days in the refrigerator, though the fruit may release some juice over time.
- → What can I serve with this for a complete dessert spread?
- This fruit salad pairs beautifully with shortbread or graham crackers for dipping. For a dessert buffet, it complements other no-bake treats like chocolate-dipped strawberries, mini tarts, or cookies. For a brunch setting, serve alongside coffee cake, muffins, or a simple yogurt parfait station.