
 Pin it
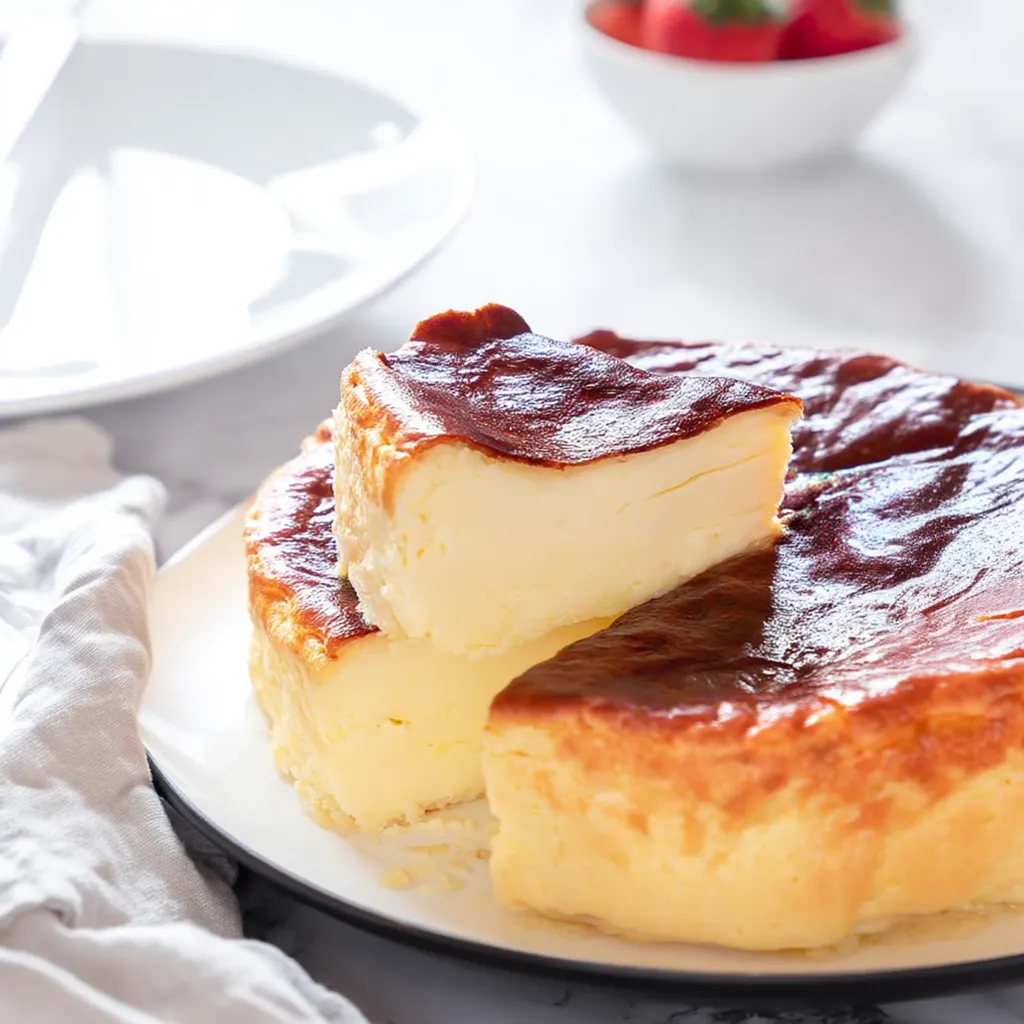
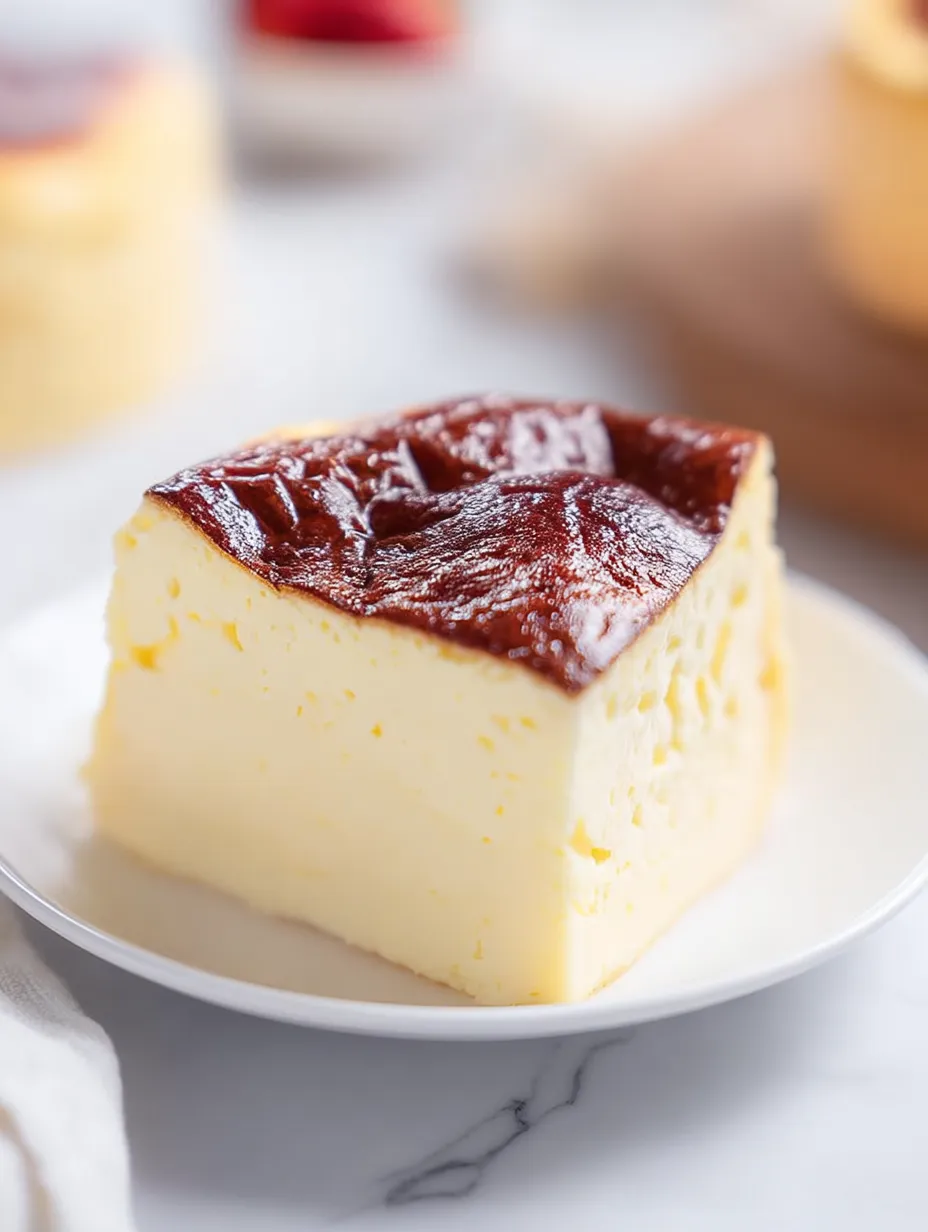
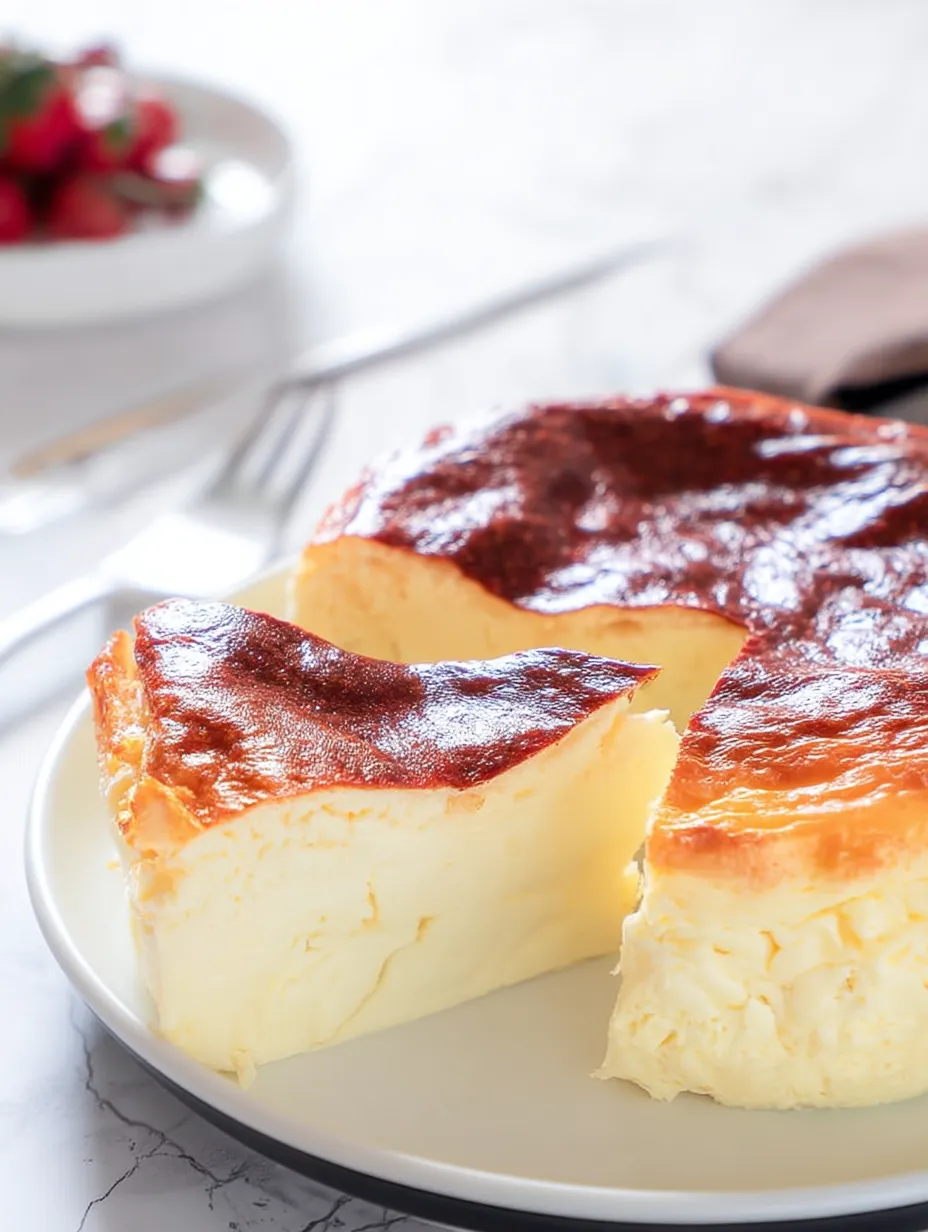
This incredibly simple yogurt cake creates a creamy, custard-like dessert with just three everyday ingredients. Unlike traditional cakes that rely on flour, butter, and sugar, this lighter version uses Greek yogurt as its base for a protein-rich treat with significantly fewer calories. The magic happens as the minimal ingredients transform during baking into a dessert with a cheesecake-like interior and slightly chewy exterior. Perfect for health-conscious dessert lovers, this versatile cake can be prepared in minutes and cooked in either your air fryer or conventional oven for a satisfying treat that doesn't derail your healthy eating goals.
I discovered this recipe during a late-night craving when I wanted something sweet but didn't have typical cake ingredients on hand. After experimenting with different ratios, I was amazed to find that just yogurt, eggs, and a touch of cornstarch could create such a satisfying dessert. My husband, who typically prefers traditional baked goods, was skeptical until he took his first bite. He immediately asked if there was cream cheese in it, surprised by the rich, creamy texture from such simple ingredients. Now it's become our go-to dessert when we want something sweet without the heaviness of traditional cake.
Simple Ingredients
- 2 cups sweetened Greek yogurt: Provides the creamy base and subtle sweetness; vanilla flavored works perfectly
- 3 large eggs: Creates structure and helps the cake set properly while adding protein
- 2 tablespoons cornstarch: Absorbs excess moisture from the yogurt for the perfect texture
The type of Greek yogurt you select significantly impacts the final result. I recommend using a sweetened, nonfat variety with vanilla flavor for the best balance of sweetness and creaminess. The yogurt serves as both the main structure and the sweetening agent, so avoid plain unsweetened varieties unless you plan to add your own sweetener. While regular yogurt can be substituted, the higher water content results in a firmer, less creamy texture. The cornstarch might seem like an unusual addition, but it's essential for absorbing excess moisture without changing the flavor or making the cake heavy.
Easy Preparation
- Ingredient Preparation:
- Begin with all ingredients at room temperature for the smoothest batter. Remove the Greek yogurt and eggs from the refrigerator about 30 minutes before you plan to make the cake. Room temperature eggs incorporate more easily into the yogurt, creating a more uniform batter without streaks. Measure 2 cups of Greek yogurt precisely, using a dry measuring cup rather than a liquid measuring cup for accuracy. Level off the yogurt with a straight edge for consistent results. Prepare a 6-inch cake pan or baking dish by lining it with parchment paper or spraying thoroughly with non-stick cooking spray. For air fryer cooking, choose a pan that fits comfortably in your air fryer basket with at least half an inch of clearance on all sides for proper air circulation.
- Batter Creation:
- In a medium mixing bowl, add the 2 cups of sweetened Greek yogurt. Crack the 3 eggs directly into the yogurt one at a time, whisking thoroughly after each addition until completely incorporated. The mixture should become lighter in color and slightly more fluid as you whisk in each egg. Be particularly attentive during this step, as any unmixed egg will create inconsistencies in the baked cake. Once the eggs are fully incorporated, add the 2 tablespoons of cornstarch by sifting it over the surface of the mixture to prevent lumps. Whisk continuously and vigorously until the cornstarch is completely dissolved and no white streaks remain. The batter should have a smooth, homogeneous appearance with a consistency similar to thick pancake batter. For best results, continue whisking for about one minute after all visible lumps have disappeared to ensure the cornstarch is properly integrated.
- Pan Preparation:
- Pour the prepared batter into your lined or greased baking pan, filling it no more than three-quarters full to allow room for expansion during cooking. The cake will rise significantly during baking before settling back down as it cools. Gently tap the filled pan against the counter several times to release any trapped air bubbles, which could create unwanted holes in the finished cake. Use a spatula to smooth the top surface of the batter, ensuring an even layer for uniform cooking. If cooking in an air fryer, make sure your pan fits properly in the basket without touching the sides or top of the air fryer chamber. For oven baking, consider placing the cake pan inside a larger baking dish and creating a water bath by adding hot water to reach halfway up the sides of the cake pan, which helps regulate temperature and prevents the cake from drying out during the longer baking time.
- Air Fryer Method:
- Preheat your air fryer to 300°F (150°C) for about 3 minutes. Place the filled cake pan in the air fryer basket, being careful not to tilt or spill the batter. Cook for approximately 20-25 minutes total, but check at the 15-minute mark by gently touching the center of the cake. It should feel set but slightly jiggly in the very center. The top will develop a beautiful golden caramelized appearance naturally. Unlike oven baking, the air fryer method creates a more evenly browned top with less deflation when cooling, resulting in a more attractive finished cake. Once the cake is fully cooked, turn off the air fryer but leave the cake inside with the drawer slightly ajar for about 5 minutes. This gradual cooling helps prevent drastic temperature changes that could cause excessive deflation or a rubbery texture. After this rest period, remove the cake and allow it to cool completely on a wire rack before refrigerating for at least two hours, which allows the flavors to develop fully and the texture to set properly.
- Oven Method:
- If using a conventional oven, preheat to 325°F (165°C). Place the cake pan in the center rack of the oven, preferably in a water bath as described earlier. Bake for approximately 60-70 minutes, though baking time may vary depending on your oven's accuracy and the exact dimensions of your baking pan. The cake is done when the edges are set and slightly pulling away from the sides of the pan, but the center still has a slight jiggle when gently shaken. Avoid opening the oven door during the first 45 minutes of baking, as temperature fluctuations can cause the cake to sink dramatically. Once baked, turn off the oven but leave the cake inside with the door slightly ajar for about 15-20 minutes. This gradual cooling process helps prevent the surface from wrinkling excessively as it deflates. After this initial cooling, remove from the oven and continue cooling at room temperature before transferring to the refrigerator for at least 4 hours or overnight. The oven-baked version typically has a more moist texture than the air fryer version, with a slightly more pronounced deflation when cooled.
The first time I served this cake to friends, I was nervous about how they'd react to such a simple dessert. To my surprise, they were amazed by the silky texture and kept asking for the "secret ingredient." When I revealed it was primarily Greek yogurt, no one believed me until I showed them the recipe. What I love most about this cake is how it satisfies my sweet cravings without the heaviness or guilt that can come with traditional desserts. It's become my favorite afternoon treat with a cup of coffee, offering protein and calcium while still feeling indulgent.
Flavor Variations
Enhance this versatile basic recipe with thoughtful additions that complement its creamy profile. For a berry-infused version, gently fold 1/2 cup of fresh blueberries or raspberries into the batter just before baking, creating bursts of fruit flavor throughout the cake. Coffee enthusiasts might enjoy adding 1 teaspoon of espresso powder to the batter, which deepens the flavor profile while enhancing the natural sweetness of the yogurt. For a more decadent treat, sprinkle 2 tablespoons of mini chocolate chips over the top just before baking, creating pockets of melted chocolate that contrast beautifully with the creamy cake texture. Those who enjoy warming spices can incorporate 1/2 teaspoon of cinnamon or cardamom into the batter, adding aromatic complexity that transforms the simple cake into something more sophisticated. Citrus lovers might appreciate adding 1 teaspoon of lemon or orange zest to the batter, brightening the flavor while adding subtle complexity that balances the creaminess.
 Pin it
Sweetness Adjustments
Customize the sweetness level of this adaptable cake to suit various preferences without compromising its texture. For those who prefer a sweeter dessert, add 2-3 tablespoons of granulated sugar, honey, or maple syrup directly to the batter during mixing. When using honey or maple syrup, reduce the amount to 1-2 tablespoons to avoid adding too much liquid. A more fiber-rich option involves adding 1-2 tablespoons of powdered erythritol or monk fruit sweetener, which provides sweetness without the caloric impact of traditional sugar. For serving, prepare a simple fruit compote by simmering 1 cup of mixed berries with 1 tablespoon of sugar until syrupy, then cooling before spooning over cake slices. A light dusting of powdered sugar just before serving adds visual appeal and a touch of sweetness to the surface without overwhelming the delicate flavor of the cake. For special occasions, drizzle individual slices with a tablespoon of warmed honey mixed with a pinch of sea salt, creating a simple but elegant presentation with enhanced sweetness.
Serving Suggestions
Transform this simple cake into an impressive dessert through thoughtful presentation and complementary accompaniments. For breakfast or brunch, serve chilled slices with a side of fresh seasonal fruits that contrast with the cake's creamy texture while adding natural sweetness and visual appeal. Create an elegant dessert by topping each slice with a dollop of lightly sweetened whipped cream and a sprinkle of toasted sliced almonds, adding layers of texture and flavor. Coffee or tea enthusiasts will appreciate how the cake's subtle sweetness pairs perfectly with a bold espresso or spiced chai, making it ideal for afternoon gatherings. For dinner parties, create individual dessert plates by placing small wedges of cake alongside colorful fruit coulis and fresh mint leaves, using the sauce to create decorative patterns on the plate. Health-conscious diners might enjoy the cake topped with a spoonful of additional Greek yogurt mixed with a touch of honey and cinnamon, reinforcing the yogurt flavor while adding creamy contrast to each bite.
Storage Solutions
Maximize enjoyment of this yogurt cake through proper storage techniques that preserve its delicate texture and flavor. For short-term storage, keep the completely cooled cake covered in the refrigerator, where it maintains optimal texture and flavor for up to 3 days. The cake actually improves after the first day as the flavors develop and the texture sets more fully. When serving from the refrigerator, allow slices to sit at room temperature for 10-15 minutes before eating to take the chill off and allow the creamy texture to soften slightly. For longer storage, individual slices can be carefully wrapped in plastic wrap and then aluminum foil before freezing for up to one month. Thaw frozen slices overnight in the refrigerator rather than at room temperature to maintain the cake's structure. This cake does not store well at room temperature due to its high protein content and should be returned to the refrigerator after serving. If you notice any liquid separation after storage, simply blot gently with a paper towel before serving to maintain the cake's appealing appearance.
 Pin it
This yogurt cake has become my secret weapon for impromptu gatherings and mindful dessert options. What began as an experiment with limited ingredients has evolved into a recipe I find myself returning to regularly. There's something deeply satisfying about creating such a lovely dessert with minimal effort and ordinary ingredients. The way it transforms from a simple batter into a creamy, custard-like cake seems almost magical each time. I particularly love serving it to friends who are watching their sugar or calorie intake - they're always thrilled to discover a dessert that satisfies their sweet tooth without derailing their health goals.
Frequently Asked Questions
- → Can I use regular yogurt instead of Greek yogurt in this cake?
- Greek yogurt is recommended for this recipe because of its thicker consistency and higher protein content, which helps with the cake's structure. Regular yogurt contains more moisture and could result in a cake that doesn't set properly. If you only have regular yogurt, you can strain it overnight in the refrigerator using a cheesecloth-lined sieve over a bowl to remove excess liquid, which will give you a texture closer to Greek yogurt. You'll need to start with more regular yogurt than the recipe calls for since it will reduce in volume during straining.
- → What can I substitute for cornstarch in this yogurt cake?
- If you don't have cornstarch, you can substitute with an equal amount of arrowroot powder, which will provide similar thickening properties. All-purpose flour can also work in a pinch, but you'll need to use twice the amount (8 tablespoons instead of 4) since flour has less thickening power than cornstarch. For a gluten-free alternative besides arrowroot, you could try potato starch or tapioca starch in the same amount as the cornstarch. Keep in mind that each substitute may slightly alter the final texture of your cake.
- → Why did my yogurt cake sink or deflate after baking?
- Some deflation is normal for this type of cake - it rises during baking due to the eggs and then naturally settles as it cools. However, excessive sinking might be caused by a few factors: opening the oven door too early during baking, underbaking (the center should not be jiggly when done), or overmixing the batter which can incorporate too much air. For best results, ensure your oven is fully preheated, avoid opening the door until at least 3/4 through the baking time, and mix the ingredients just until combined. The cake will still taste delicious even with some deflation - it's part of its rustic charm!
- → Can I make this cake with flavored yogurt instead of vanilla?
- Yes, you can experiment with different flavored yogurts to create unique variations of this cake. Lemon, strawberry, blueberry, or honey-flavored Greek yogurts can all work well. Keep in mind that many flavored yogurts already contain added sugars, so you might not need to add extra sweetener. You may also need to adjust the baking time slightly as the moisture content can vary between flavors. For a more subtle approach, use plain Greek yogurt and add your own flavorings like lemon zest, vanilla extract, or a teaspoon of matcha powder to create custom versions.
- → How can I tell when the yogurt cake is properly done?
- The cake is done when it has puffed up, the surface has a caramelized appearance, and the center is no longer jiggly or liquid when you gently shake the pan. In an air fryer at 320°F, this takes about 20-23 minutes, while in a conventional oven at 350°F, it takes significantly longer (70-75 minutes). A toothpick inserted into the center should come out mostly clean, though it might have a few moist crumbs due to the cake's custard-like nature. The cake will naturally deflate somewhat as it cools, which is normal and doesn't indicate underbaking. Let it cool completely and chill for at least 2 hours before judging the final texture.